Strawberry Banana Smoothie

Let me start today by giving everyone a little word of wisdom from me. Buying a personal blender is one of the best decisions a person can make when trying to clean up their eating habits. I chose to purchase the Magic Bullet Blender for my self.

IMG_5542

These blenders are perfect for a quick breakfast or easy snack between meals. By always keeping some fresh fruit on hand, you will be ready to go at a moments notice.

For my smoothie of the day, I decided to use some of my fresh fruit I had lying around the apartment that was close to going bad. 2 Bananas, 7 Strawberries, 8 spoonfuls of Greek Yogurt and a handful ice is all that was needed to create this masterpiece.

I started by tossing in a handful of ice and thinly slicing two bananas on top. I then proceeded to scoop in my greek yogurt until I felt it would yield the consistency I wanted (about 8 spoonfuls).

Because my blender is small, by this point it was getting pretty full. This is no problem, I just screwed on the cap and blended the current ingredients until smooth. This created more room for me to add in my chopped strawberries and blend once again.

I continued to blend until the mixture was smooth, and voila! A quick, easy, healthy and delicious smoothie for any occasion!

 

Back Again!

English: Fruit stall in a market in Barcelona,...

English: Fruit stall in a market in Barcelona, Spain. Français : Étal de fruits dans un marché à Barcelone (Espagne). Deutsch: Obststand auf einem Markt in Barcelona, Spanien. (Photo credit: Wikipedia)

Hello again readers! It has been quite a while since I posted on here, so I figured I would take the first blog of the semester to describe the direction I will be taking my blog, and also to catch you up on a little bit of what has been going on over the last few months.

This summer flew by before I even had time to blink an eye. I spent a majority of my short summer taking online classes, working, and assistant coaching for my old high school cheerleading team. It was fairly uneventful, but the time off was very much-needed.

In coming back to SIUE this fall, I enrolled in SPC 313, a Public Relations writing course. One of the requirements for this course is continued weekly postings in this blog. I enjoyed this assignment last semester, and am looking forward to it again this semester.

This time around I decided to take a different approach to my postings. For the duration of this semester I plan on posting recipes for my weekly blog. I have set a personal goal for myself of cooking at least one healthy dinner a week. As I prepare these meals I will be documenting the preparation steps as well as taking pictures of the things that I prepare and sharing them with my readers.

I hope that all of my readers enjoy the changes I will be attempting to make in my blog this semester. Also, to my fellow bloggers, good luck and happy blogging!

Snack Time Anyone?

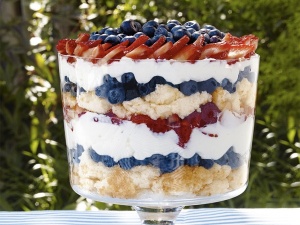
Today I decided to talk about something a little bit different. Ever looking for a quick and easy snack  that is certain to be a crowd pleaser? If so, I have the perfect recipe for you to add to your list: Angel Fruit Trifle!

185703184605023972_fWuSMvNP_f      This is a dessert that my mother and I have made together for as long as I can remember. She used to make this dish for every party or potluck that came up, and now that I am older, that torch has been passed to me.

This Oh-So-Yummy dish is incredibly simple to make. You will need only a few simple ingredients before getting started:

1. One Angel Food Cake

2. Fruit of your choice (I use strawberries, blueberries, blackberries, raspberries, and sometimes either grapes or kiwi for a little extra color)

3. 1/2 Tub of CoolWhip

4. One box of Vanilla Instant Pudding

Once you have collected all of the items, it is time to do some mixing. Begin by preparing the Vanilla Instant Pudding by simply following the instructions on the box. Once the pudding has set, combine it with the half tub of CoolWhip. Mix until evenly blended.

Now for the fun part, layering! Start by cutting the angel food cake in half and tearing it into pieces. Dump these pieces into the bottom of the bowl to create your first layer. On top of the angel food cake, pour half of the Pudding/CoolWhip mixture. For your third layer, throw in a little more than half of the fruit that you have prepared to finish off your third layer.

Now that your first three layers are finished, all you have to do is repeat! Angel food cake, pudding mix, fruit! My own personal tip for your second layer of fruit (the top of the cake), is to create an inviting display with the remaining fruit. If you are not feeling creative or do not have the time to “fancy it up”, pouring the fruit on top will work just fine!

Once all your layers are done to your liking, simply refrigerate until it is time to serve, then grab a big spoon and DIG IN!

Happy Eating!